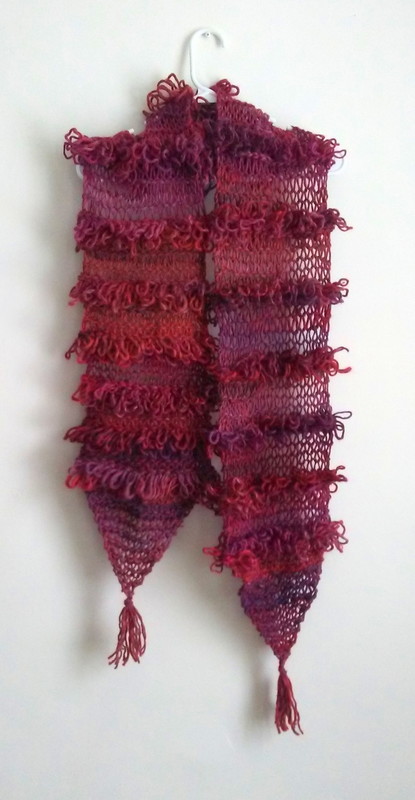
I salvaged this yarn from a sweater. I cast on 18 stitches using 9mm needles, and alternated with knitting 6 rows then 4 rows of loops. By knitting the plain areas very loosely I lightened the scarf visually, and also literally because if it were all loops I think it would be too thick and hot for comfort. Once the body of the scarf was finished I thought of adding the tapered sections, so those were knitted separately and sewn to the squared ends of the scarf. The tapers were easy: I cast on 18 stitches and at the end of each row picked up two stitches at once which evenly reduced the piece into a neat triangle.
Learning to knit loops was a little confusing at first, until I found a Youtube video which made it all clear. With a few different methods for holding knitting needles and executing stitches I recommend watching various videos and practicing the stitches until you find a technique that works for you.
By starting and unraveling about fifteen test pieces here is what I learned about loops:
* To make the loops only on one side of the piece you create a row of loops, then knit or purl the next row, then next row all loops.
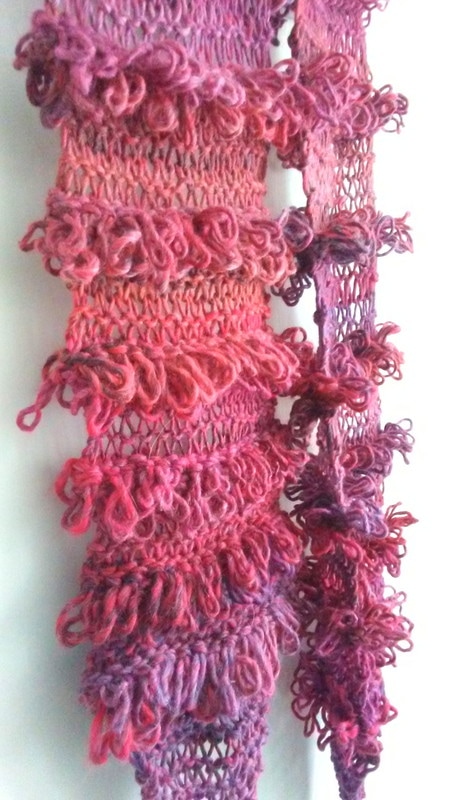
* Looping every row puts the loops on both sides of your work, which is what I did for the scarf by consecutively knitting four rows of loops.
* Loop one knit one (or loop one, knit two... whatever) gives you a lighter effect and the work goes a bit quicker.
* If you use a really thick yarn and do the loops on one side it makes a super soft and plush piece that I think would be very nice as a seat cushion.
For this scarf I "locked" each stitch individually as I did it, which made it a little bulky. If I ever make the loop knit sweater in my Complete Book of Needlecraft the method described calls for you to make the loops without pulling the yarn over each stitch, and instead you complete and close the stitch when you knit the next row in the back, which results in a piece that is less knobbly. (A week ago I would not have understood what I just wrote and I may be doing a bad job describing it; but if you're a beginner I am sure once you learn the loops this will make sense.)
I think this stitch is definitely accessible to a beginner. It may take a bit of time to get a quick rhythm going, but it doesn't require you to keep count or follow a pattern to execute a neat effect.
Learning to knit loops was a little confusing at first, until I found a Youtube video which made it all clear. With a few different methods for holding knitting needles and executing stitches I recommend watching various videos and practicing the stitches until you find a technique that works for you.
By starting and unraveling about fifteen test pieces here is what I learned about loops:
* To make the loops only on one side of the piece you create a row of loops, then knit or purl the next row, then next row all loops.
* Looping every row puts the loops on both sides of your work, which is what I did for the scarf by consecutively knitting four rows of loops.
* Loop one knit one (or loop one, knit two... whatever) gives you a lighter effect and the work goes a bit quicker.
* If you use a really thick yarn and do the loops on one side it makes a super soft and plush piece that I think would be very nice as a seat cushion.
For this scarf I "locked" each stitch individually as I did it, which made it a little bulky. If I ever make the loop knit sweater in my Complete Book of Needlecraft the method described calls for you to make the loops without pulling the yarn over each stitch, and instead you complete and close the stitch when you knit the next row in the back, which results in a piece that is less knobbly. (A week ago I would not have understood what I just wrote and I may be doing a bad job describing it; but if you're a beginner I am sure once you learn the loops this will make sense.)
I think this stitch is definitely accessible to a beginner. It may take a bit of time to get a quick rhythm going, but it doesn't require you to keep count or follow a pattern to execute a neat effect.
Loop It Up!